|
|
|
|
|
|
| Underwater Photography Basic Shutter Speed, Aperture and Depth of Field by Bill Hartley
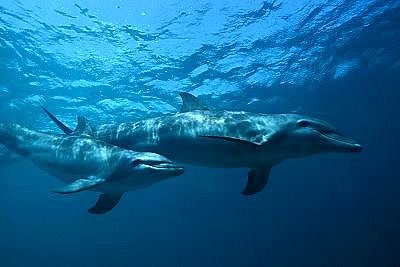
Shutter speed: expressed in fractions of a second, is the length of time light is entering a camera and exposing film. Aperture: is expressed in terms of F-stops and is the size of the opening through which light enters a camera. Depth of field: is the portion of an image, front to back, that's in focus. Knowing what shutter speed, aperture and depth of field do does little to help one create a better photographic image. What we really need to know and learn is how each affects our photography and if we change one or more of these parameters, how each will affect the others, and ultimately how our photographic results will vary. In other words, we need to know, to vision, in our mind's eye what it is we wish to accomplish, and what it is we want to achieve, before we can set our camera's parameters of aperture and shutter speed, which ultimately determine our depth of field and the look of our final image. In order to understand and apply our knowledge of shutter speed, aperture and depth of field we need to work from our desired result backward. Most often the technical concepts of shutter speed, F-stop (another term for aperture opening) and depth of field are presented as independent concepts, and all too often abstract and out of context. We learn that the size of the aperture opening and amount of ambient light dictates the shutter speed, but not really how this affects our photographic results. We know that the size of the aperture opening helps determine depth of field. It is not always clear however, how to apply and actually use this knowledge. Again, how do we tie shutter speed and aperture together to create good photography? And how does each contribute to creating our desired depth of field while giving us balanced images? Pulling the Basics Together Personally, I have found that if one can envision a desired photographic result, i.e., what it is they think they want an image to look like, than it is much easier to capture that image; as opposed to trying to grasp at a result you are not sure of. Understanding these basic photographic technical concepts and how they work together can best be achieved by looking at our own images, as well as the images of others. We need to evaluate each image and determine what the camera's settings might have or could have been when the photo was taken. Then we need to envision what the result would be if the settings were changed. Look at the adjacent image of the pair of bottle noise dolphins, and note that the blue water in the background is exactly what you see when you are diving. Notice the background, the color closely represents reality, which was exactly the result I was "shooting" for. In this case, the camera's aperture opening was f8 and it's shutter speed was 1/125th - creating a "balanced" image. If this image had a background of dark deep blue to black, then the image would have been underexposed. If the results were whiter to a washed out image, it would have given me an overexposed photo. The camera settings for this image were determined with an independent underwater light meter. Because even with the best camera systems in the world it's always a good idea to double-check your reading when shooting underwater. In this case the meter was set to the camera's film speed of 100 ISO, and a preferred shutter speed of 1/125th of a second. A light reading was taken. Shutter speed, film speed, and ambient light were processed by the meter and it was determined that the necessary aperture opening / f-stop would be f8 to create image you see here. If I had wanted a darker image I would have had to either reduce the aperture opening, which would create a smaller opening and allow for less light to enter into the camera and expose the film; or I would have had to decrease my shutter speed, which would allow less light in by exposing my film for a shorter period of time. Conversely, if I had wished to create an image with a lighter background I would have increased the amount of light entering the camera by opening up the aperture, thereby allowing more light in for the same fraction of a second. Or I would have had to increase my shutter speed, which would allow the same amount of light in, but for a longer period of time. You ask, why was this image shoot at 1/125th of a second as opposed to 1/60th or 1/250th? The answer will take us down several different paths, even if we discount the factor of movement. Keeping proper exposure in mind at all times, we need to look at what happens to the aperture opening when we change shutter speeds. If we increased the length of shutter speed to 1/60th of a second, the aperture opening would have been reduced in size; allowing less light in for a longer time. If we reduced our shutter speed to 1/250th of a second the aperture opening would increase in size; a larger opening with shorter time. Refer to graph:
Minimizing movement has a lot to do with creating a sharp image. Keep in mind that the seas are in perpetual motion; motion that can make potentially great images into soft edged ones. Hand holding a camera, as we would in mid-water and capturing a technically sharp image might be difficult with slower shutter speeds, at times it is next to impossible to create a sharp image when shooting at 1/60th of a second in a surge.
|
|||||||||||||||||||||||||||||||||||
|
|
|
|
|
|
|
|
|
 In
In