
|
|
|
|
|
|
| Underwater Light by Bill Hartley Last weekend I helped some friends out at the Beneath the Sea dive show. While working at the show with Sport Diver Magazine and Sea & Sea cameras I received a lot of questions relative to flashes, strobes lighting, and how they work and don't work with respect to getting better images. As a result, I realized that many underwater photographers do not have a good feeling or understanding of marine lighting, either natural or artificial, or how to control light to improve their underwater photography.
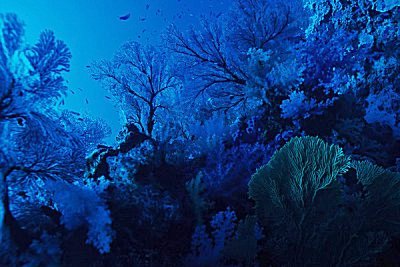
Simple Natural Lighting "Where do all the colors go?" As one dives deeper into the blue abyss, the amount of ambient (natural) light dissipates. The aquatic world is soon filled with blues and greens, at times it can even appear muted and monochrome. As we go deeper, it gradually becomes darker to a point of total blackness. The colors within the light spectrum dissipate as the light travels through water. The first color to fade and disappear is red. At a depth of eight feet, red light starts to fade and it is filtered out of the visible light spectrum by 15 feet. The next diminishing color is orange at 15 feet; by 50 feet, it has disappeared. Next to fade are yellow, green blue, indigo and violet. Light is so low at 600 feet down that photosynthesis has stopped. The total absence of light occurs at about 1,800 feet. |
||||
|
||||
| In fact, most underwater camera manufactures
have created specialized housings designed to withstand the riggers of an
aquatic environment, and have adapted basic point and shoot cameras to
their housings and vice versa.
Underwater Red Eye Basic underwater cameras do a good job in creating snap shots. They give us images to take home, and to show friends what its like underwater. The placement of the flash in a basic point and shoot underwater camera is the same as in its dry land cousin, placing the flash unit just up and to the right of the camera's lens. Not bad for general snap shots. But under less than perfect conditions this configuration can reduce less than perfect results. The proximity of lens and flash are important. The result of placing the a flash close to the camera's gives people red-eye in family photos. In underwater photography it creates high concentration of backscatter, white outs and hot spots. Backscatter looks like snow in your underwater shots. White outs and hot spots are really bright sections and centers. Keep in mind, our photos are better over all, simply because of the flash. But if we wish to reach the next level we need to understand and address these issues.
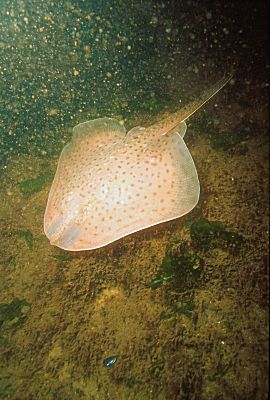
When we are close to our subject underwater, as we often are in order to get the best possible photographic results, we sometimes have hot spots, in other words, areas that are over exposed and appear white in the final image. A basic camera is designed for utilization under average conditions and therefore cannot compensate for any situation outside the average. In other words, if we are to close to our subject, the flash may be too strong and parts of the image are washed out. If we are too far away from our subject, there may not be enough light reaching it, for proper exposure. Caption: With the flash next to the lens, this Clean Noise Skate is not only over exposed, but all of the backscatter reflects and appears in the image. Minimizing Light Reflections Simple solutions are sometimes the best. I have found that by defusing my light source, I can "soften" my photographs and get more consistent results. Keep in mind that it's easier to work with a photo that is slightly underexposed than with one that is over exposed in which the details have been washed out.
The Next Level The only way to really minimize such problems is to upgrade your underwater photographic system. If you take the time to investigate, you will notice that many underwater photographic systems start with basic point and shoot cameras but quickly go well beyond. They offer external strobes or sub-strobes (underwater flash) as upgrades. By adding external strobes, the photographer can now control the point(s) from which the light is coming. Note: A large number of camera manufacturers now offer external strobe attachments even for basic underwater cameras. How Strobes Work Head on Flash: Direct flash (the point and shoot) has a tendency to create harsh lighting, the kind of light found mid-day on the equator. Shadows are short, which diminishes the perception of depth and colors can become washed out as mentioned above. Correcting the Problem: Add an external strobe. As we move our strobe off to one side a number of things change. Light no longer reflects directly back into the camera's lens which reduces the chance of backscatter. When the strobe is off to one side we create shadows as well, which in turn increases the perception of depth of field.
One problem that arises with the utilization of one side strobe is hard shadow lines. Although some of these photographs may appear dramatic, such shadows often appear unnatural and the majority of your images just won't feel right.
Understanding the effects of a strobe and how to utilize one on a photograph subject will greatly improve your photographic results. The problem is however, that we rarely test our flash setups before venturing underwater. It might help to practice with our systems on land first where it's much easier to experiment. Try one and then two light sources. Move the flashes in and out from side to side. Then study your results; you'll be surprised as to how they will vary with even the slightest of changes. Just remember that the light from the flash will fall off faster underwater. Once you understand how flash works and where the shadows and hot spots come from, you will be able to control light, color saturation, and shadowing simply through strobe placement. The end result will be better underwater images. |
||||
|
|
|
|
|
|
|
|
|
 Why the "Red Eye" Remember your high school physics, the part
about vectors. Sure you do. Simply put, when an object, traveling in a
straight line, strikes a smooth straight surface, it will bounce back at
the same, yet opposing angle. So let's apply this basic principle of
physics to the modern point and shoot camera design. Light travels in a
straight line from the flash, which is right next to the camera lens. It
reflects off surfaces directly in front of the camera and back into the
camera's lens. It is this reflected light off the blood vessels in the eye
that causes red eye in people; and in the case of underwater photography
it is the reflections off of fine particles adrift in the water that
causes white outs and backscatter.
Why the "Red Eye" Remember your high school physics, the part
about vectors. Sure you do. Simply put, when an object, traveling in a
straight line, strikes a smooth straight surface, it will bounce back at
the same, yet opposing angle. So let's apply this basic principle of
physics to the modern point and shoot camera design. Light travels in a
straight line from the flash, which is right next to the camera lens. It
reflects off surfaces directly in front of the camera and back into the
camera's lens. It is this reflected light off the blood vessels in the eye
that causes red eye in people; and in the case of underwater photography
it is the reflections off of fine particles adrift in the water that
causes white outs and backscatter.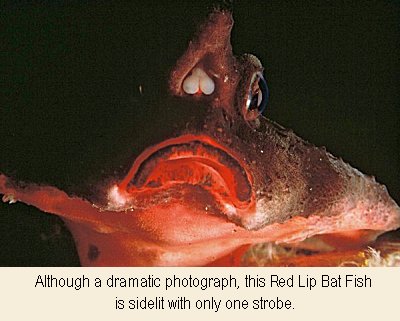 When we add an external strobe, the built in flash
unit is
altered and no longer sends light out directly. By moving your strobe
further from the camera's lens, you reduce white outs and backscatter. Keep in mind, full powered strobes with
wide-angle lenses at close distances, regardless of their angle, can create hot
spots. If you use a diffuser on your strobe, the light will not be as
harsh and consequently the color saturation will increase.
When we add an external strobe, the built in flash
unit is
altered and no longer sends light out directly. By moving your strobe
further from the camera's lens, you reduce white outs and backscatter. Keep in mind, full powered strobes with
wide-angle lenses at close distances, regardless of their angle, can create hot
spots. If you use a diffuser on your strobe, the light will not be as
harsh and consequently the color saturation will increase. A camera with double strobes supplies the greatest
quantity of even light. For the most natural look it is best to utilize
either two strobes of different intensities, or if the strobes are of the
same power, make sure they are not in the same plane, ie: each should be
placed at a different distance from the subject. In either one of these
situations one will create a dominant shadow, while the other adds lesser
light to soften the shadow lines and add softer fill light to illuminate
and add detail to shadow areas. The resulting images will appear more
naturally balanced and be more pleasing to the eye.
A camera with double strobes supplies the greatest
quantity of even light. For the most natural look it is best to utilize
either two strobes of different intensities, or if the strobes are of the
same power, make sure they are not in the same plane, ie: each should be
placed at a different distance from the subject. In either one of these
situations one will create a dominant shadow, while the other adds lesser
light to soften the shadow lines and add softer fill light to illuminate
and add detail to shadow areas. The resulting images will appear more
naturally balanced and be more pleasing to the eye.